Case Study
1. Overview
Tacklebox is an open-source serverless framework offering webhooks-as-a-service. In addition to the core webhook API, it includes a command-line tool to facilitate easy deployment, a management UI with a metrics dashboard, and four client libraries in JavaScript, Ruby, Python, and Go. Tacklebox deploys on AWS infrastructure and provides a centralized webhook service for your existing applications.

In this case study, we introduce webhooks, explain why building a webhook feature is difficult, and explore existing real-world solutions. Later, we talk about deploying and using Tacklebox, summarize its architecture and how we built it, and examine additional features we would like to add.
2. Introduction
2.1 What are webhooks?
Webhooks are all about event notifications. The term webhook is a concept, not a formalized specification, and lacks an agreed-upon set of rules. However, with exposure to different webhook implementations, this “event notification” pattern emerges.
Imagine you are working with your team in a shared Github repository. You want to be notified each time your team creates a new branch.
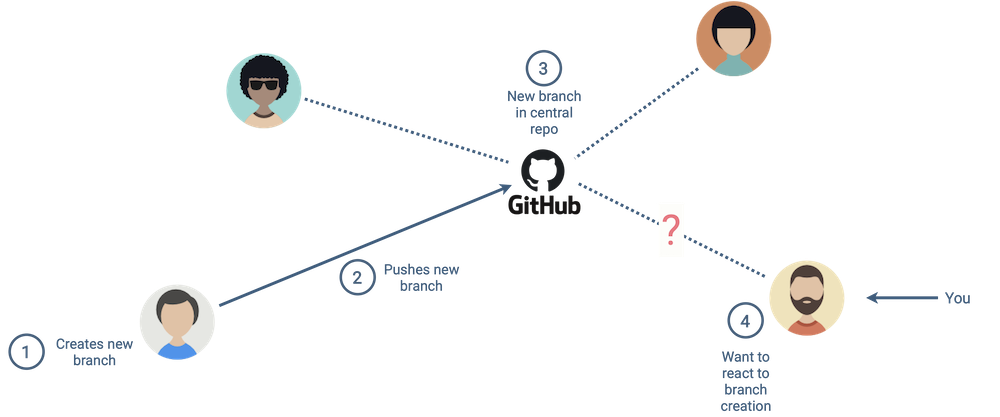
Chances are you aren’t interested in sitting around refreshing your web browser as you wait for a new branch to be created. One way to accomplish this is to periodically poll the source for updates.
With polling, you send periodic HTTP requests to GitHub asking if a new branch has been created. Since you may not know exactly when a branch is created, you have to ask Github at frequent intervals. This is the automated version of sitting around refreshing your web browser as you wait for updates.
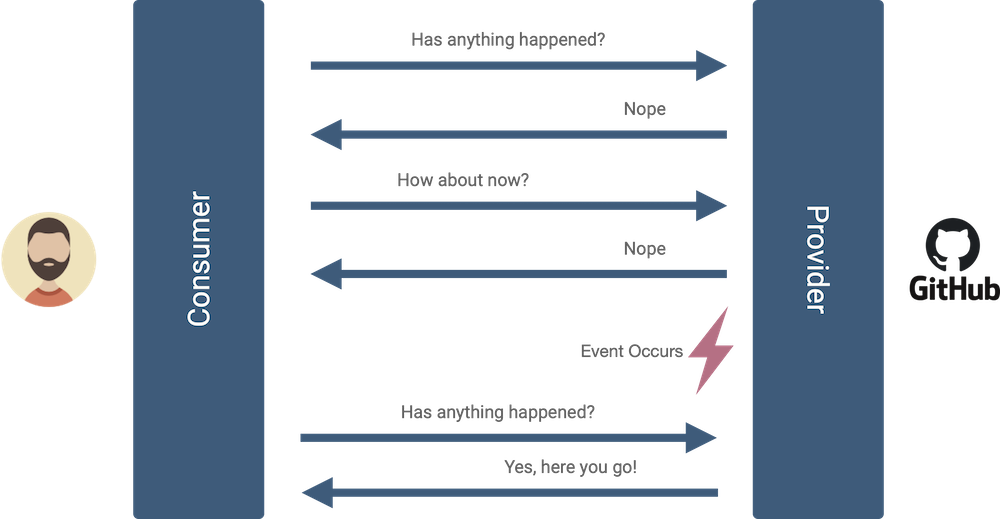
Polling results in many unnecessary requests, especially considering you may need to decrease the polling interval (delay between requests) to receive event notifications more quickly. A better option than periodic polling is to use a webhook. With webhooks, you provide Github with a URL endpoint that you control, select event types you care about, and GitHub notifies you via an HTTP request each time the event happens.
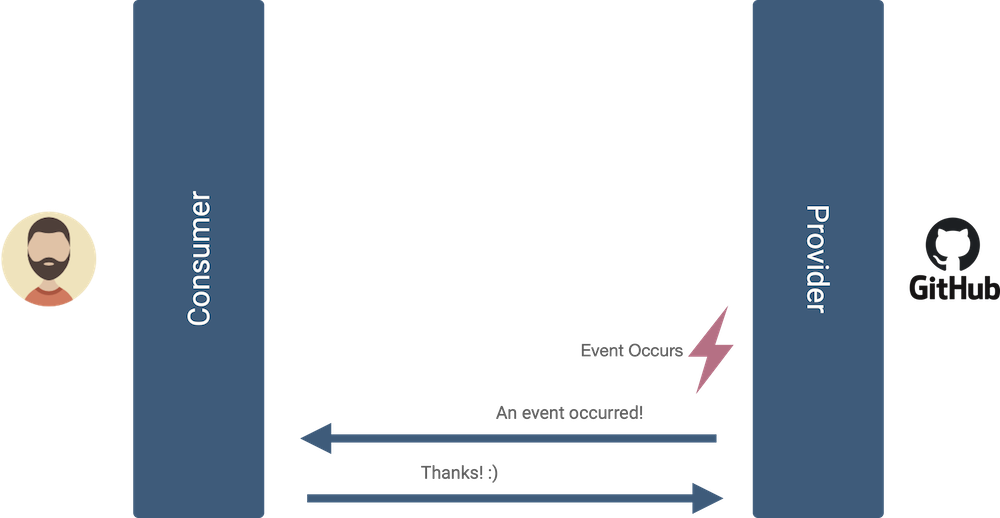
Compared to polling, the webhook approach uses fewer resources, and provides updates as events occur. The webhook provider, Github, responds to fewer requests, and the webhook consumer, the end-user, sends fewer requests.
We’ve been discussing Github, but in reality webhooks are everywhere. Here is a small sampling of other companies using webhooks:
2.2 How to use webhooks
As a webhook consumer, you can start receiving webhook notifications by registering your URL endpoint and indicating which events you care about. We refer to this grouping, consisting of a URL endpoint and event types, as a subscription. Though the process to create a new subscription varies by company, you typically submit a form found in the settings.
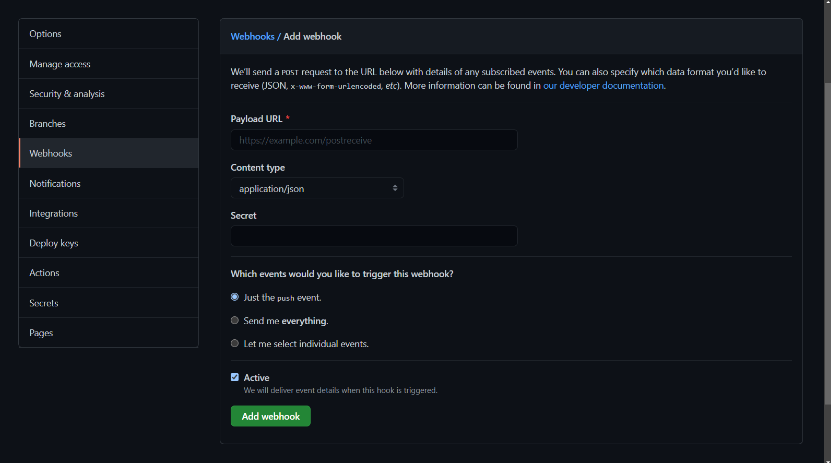
On Github, you can get started with a couple steps:
-
Navigate to the “Webhooks” settings page of your repository. In the top right, the "Add webhook" button is used to add a new webhook subscription.
-
Specify a URL endpoint where you want to receive webhook notifications. Select event types you care about, and other optional configuration settings, then click “Add webhook”.
After creating a webhook, you can view your webhook message history, their payloads, and additional metadata. If desired, you can manually resend a message through the same interface.
2.3 Overview of providing webhooks
If you are a webhook provider like Github, how would you build a webhook feature? You’d first need to identify which events your users might want to be notified about, and which of those are technically feasible. You’d want each instance of the same event to have a consistent label so that you can handle it the same way every time. This label is what we call an event type.
Once you’ve established your list of event types, you’d then need a way to identify where to send webhook notifications when an event occurs. Github has millions of repositories, and when an event happens in one, they only want to notify, at most, the people who have access to that specific repository. Within that repository, they might want to further specify which of that repo's users gets notified and for which events. This is where the idea of a subscription comes into play.
Subscriptions are URL endpoints and the event types those endpoints should be notified about. For example, if a Github user wants to be notified at "www.myurl.com/branches" when branches are created or deleted on their team's repo, they would create a subscription that specifies that. By allowing your users to create subscriptions, you are effectively telling them that you will notify them at a certain URL when certain event types (and only those event types) happen in their repository.
Having distinct subscriptions also enables your users to create multiple subscriptions if they'd like to handle different events in different ways. If the user above also wants to be notified when pull requests are made, but they want to be notified at "www.myurl.com/pullrequests", they would create a second subscription for that.
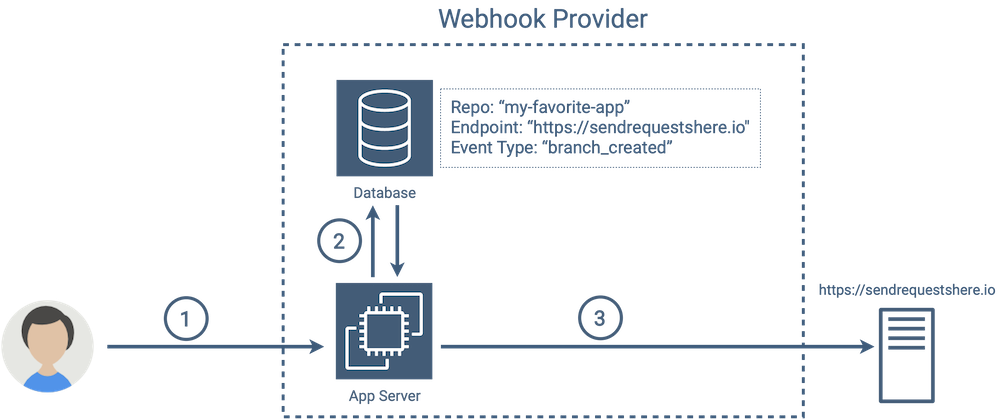
Once you have event types and subscriptions, you have all of the information you need to properly notify your subscribers when events happen. From Github’s perspective, the previous branch creation example would look something like:
-
A new branch is created
-
Github queries the database to retrieve a list of endpoints subscribed to the “branch_created” event type
-
Github sends a webhook notification to each endpoint in the list
While the above considerations are fairly straightforward, we’ve only been discussing building a webhook feature at a high level of abstraction. In reality, adding a webhook feature requires careful thought and can impact your existing infrastructure. In the next section, we examine some of the reasons why this is difficult.
3. Building Webhooks Is Not Trivial
3.1 Considerations when building webhooks
Implementing webhooks is not as easy as it may seem at first glance. Four distinct areas may present significant challenges when building a webhook feature.
Endpoint Failure
The most obvious category (and arguably the most important) revolves around endpoint failure. What happens if a consumer URL endpoint is unreachable or a message delivery fails? Do you try to send the message again, and if so, how often and how many times do you retry before stopping?
Security and Authentication
The second category is security and authentication. How do you ensure the appropriate consumer controls an endpoint before you send messages to it? How do you allow consumers to verify the integrity of messages? How about allowing them to verify the origin of messages?
Monitoring
The third category involves monitoring. How do you identify failing endpoints, and are you able to monitor historical usage patterns?
Consumer Experience
The final category is all about the consumer experience. Do you allow your consumers to manually trigger test events? Is there a mechanism to reattempt message delivery, even if all automatic retries have been exhausted?
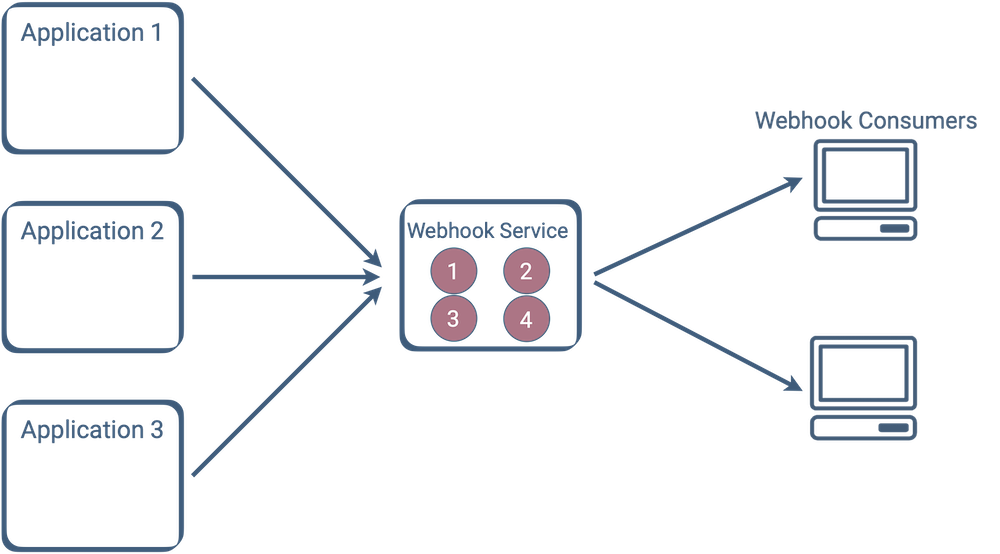
3.2 Building webhooks for a single application
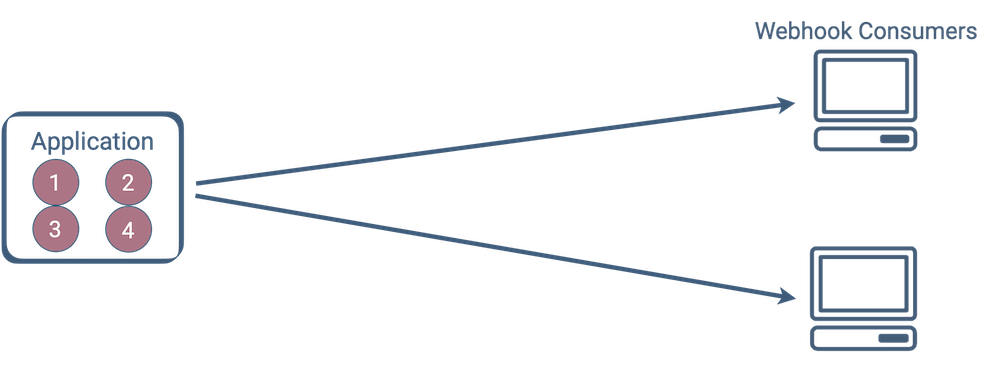
In the simplest scenario, building a webhooks feature in one application may look something like the diagram below. The webhook feature, which must address the four concerns mentioned in the previous section, is integrated alongside the application's business logic, typically running on the same application server. (For simplicity, we show two consumers, but there could be more.)
The numbered red circles inside the app represent the four areas of concern mentioned in the previous section.
3.3 Building webhooks for multiple applications
Suppose you are satisfied with your Github webhook notifications and are interested in adding a similar feature to other applications. A multi-app webhook feature might look something like this:
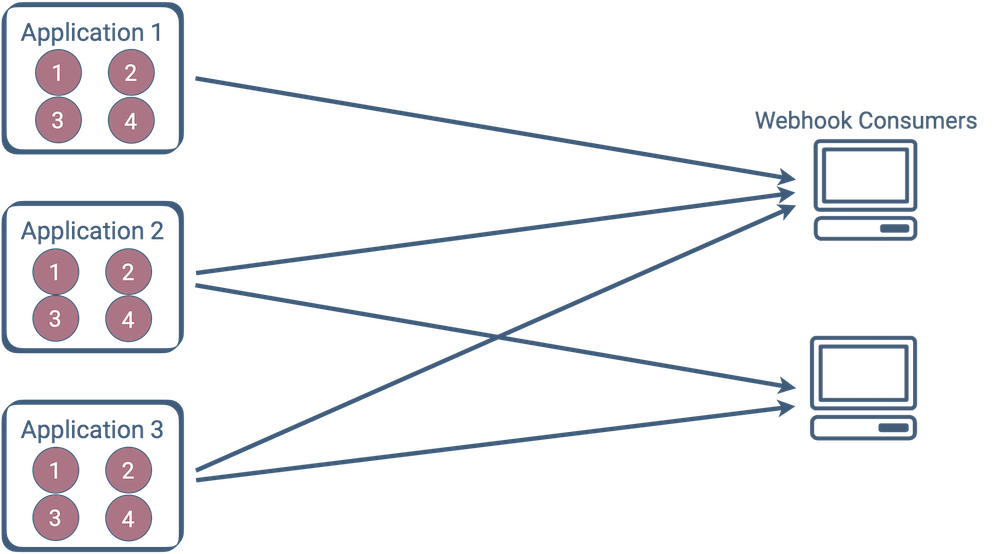
Now, you have multiple distinct webhook implementations addressing the same concerns. Maintenance, new features, and bug fixes need to be replicated across each implementation.
This multi-application scenario raises a few important questions. How do you avoid redundant work while implementing and maintaining webhooks across all your apps? How do you make sure that webhooks are consistent across all your apps? If governance or compliance is critical to your app, how do you enforce control over your data?
Extracting these webhook features into a centralized location can help address these concerns.
3.4 Extracting webhooks into a service
At this point, the value of a centralized webhooks service should be more clear. By shifting the webhook-specific code (addressing the areas of concern introduced in section 3.1) into a single service, you gain some key benefits. You have a single place to maintain code, add features, monitor service performance, and debug failed messages. Your webhook infrastructure is exclusive to your webhook service, and can be scaled according to its needs. This also means that your non-webhook applications can focus on their own concerns, and you have centralized control over data to enforce governance or compliance.
Though a centralized webhook service is an attractive option, finding or designing one that meets your needs can be difficult.
4. Existing Solutions
When designing Tacklebox, we studied existing webhook-as-a-service solutions. Many companies have already implemented in-house webhook-as-a-service solutions and shared their experiences in engineering blog posts, which we found crucial when creating our architecture. Here, we focus on two in-house webhook-as-a-service solutions, from Square and Wise Engineering, before looking at third-party paid solutions.
4.1 In-House Solutions
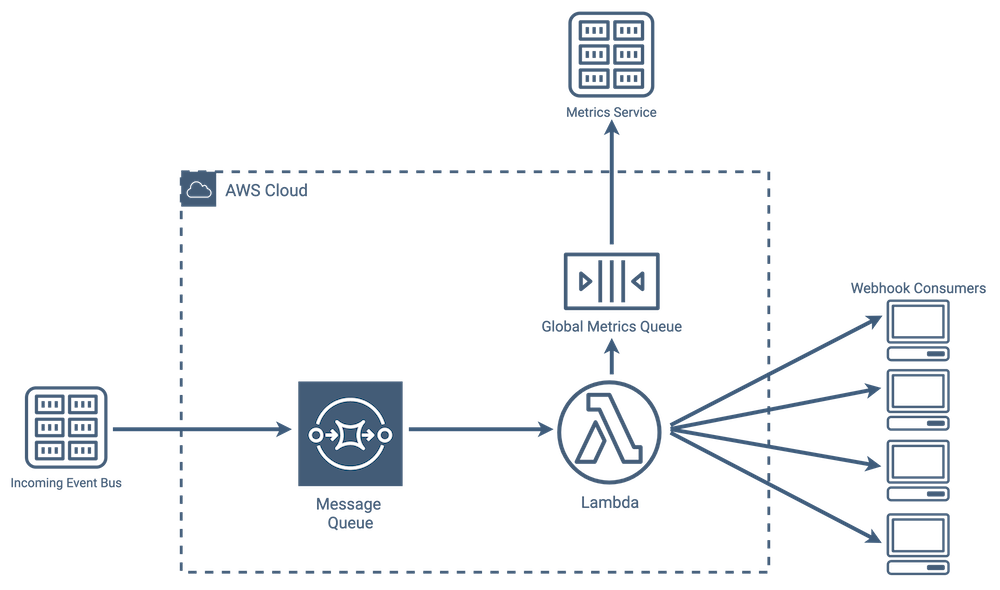
We took inspiration from how Square implemented webhooks-as-a-service [11], shown in the diagram below. The “Message Queue” acts as a buffer during periods of high usage. Without the queue, they would risk data loss if the lambdas responsible for message delivery were at-capacity.
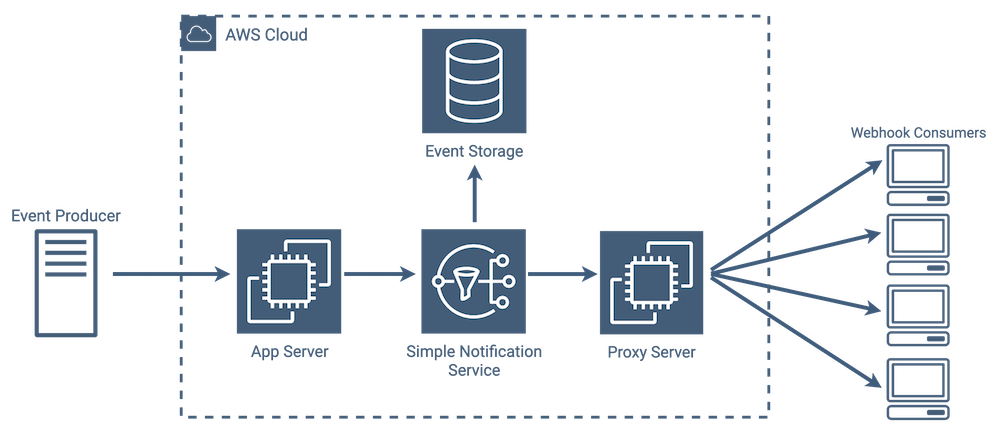
We also liked Wise Engineering’s webhook service implementation [12], shown below. Compared with Square’s approach, one of the more stark differences is that they used Amazon’s Simple Notification Service (SNS) rather than a queue. SNS offers a few features well-suited to webhooks, like subscription management, message fanout, and message delivery. If a message delivery fails, SNS can be configured to retry automatically. It also offers optional rate limiting, to ensure endpoints are not overwhelmed by a flood of requests.
Though both companies approached webhooks-as-a-service in slightly different ways from an infrastructure perspective, their implementations are comparable. Incoming events are separated into messages, queued, and delivered to interested endpoints. We discuss Tacklebox’s implementation in more detail later, but in general our approach is similar to both Square and Wise Engineering.
4.2 Commercial vs. DIY
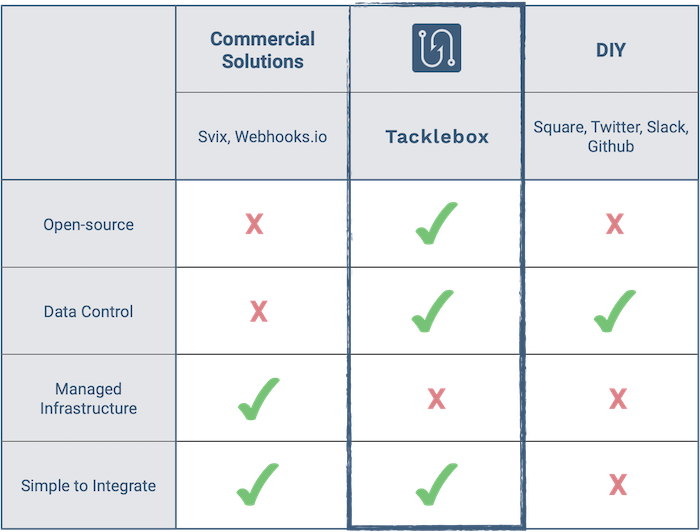
We identified two existing webhook-as-a-service providers, Svix and Webhooks.io. These paid services provide an API to create event types, subscribe endpoints to event types, send messages, and access message history.
The commercial solutions handle message delivery, data storage, and infrastructure management. However, by using a paid provider you share data with a third-party vendor, and may be limited by a lack of software customization. A DIY approach will take longer to implement and requires that you manage your own infrastructure. By accepting these tradeoffs, you maintain control of your data and can customize your service to meet evolving needs. Examining the benefits and drawbacks of each approach, we set out to create an open-source framework that balances flexibility and control over data with ease of deployment and integration.
4.3 Tacklebox use case
Tacklebox is best-suited for small- to medium-sized applications which prioritize data governance and are looking to quickly get up and running with a robust webhook-as-a-service solution. Although we have designed Tacklebox to be robust and extensible, it’s not a good fit for every scenario, like extremely high volume workloads. During load testing, it successfully delivered 12,000 webhook messages in a ten minute timeframe, and persisted each message to the database. We were satisfied with these results, but it may not be well-suited to large applications that generate hundreds of thousands or millions of events in the same time frame.
5. Using Tacklebox
Generally speaking, there are two stages to using Tacklebox. The first is the setup stage, in which you spin up the Tacklebox infrastructure and add all of the entities necessary to use the service. The second is the event stage, during which Tacklebox starts receiving events and sending out webhook messages to subscribers.
5.1 Setup
Deploying Tacklebox
Before you start setting up Tacklebox, you’ll need to make sure that you have an AWS account and three npm
packages installed: aws-cdk, aws-cli, and tacklebox-webhooks, which is our CLI tool. Once you do, creating the
AWS infrastructure that comprises the webhook service is done with one command: tacklebox deploy.
In addition to provisioning the necessary AWS services, this command also pre-populates the Tacklebox database with some required information and builds the management UI.

Take note of the API Host and API Key that this command outputs - you’ll need them to communicate with the Tacklebox API. Once completed, the Tacklebox API is ready and we can continue our setup by adding some entities.
Tacklebox Entities
Tacklebox has six entities: services, event types, users, subscriptions, events, and messages. We’re going to discuss each in detail in the following sections, however it’s important to note how they all relate to each other first.
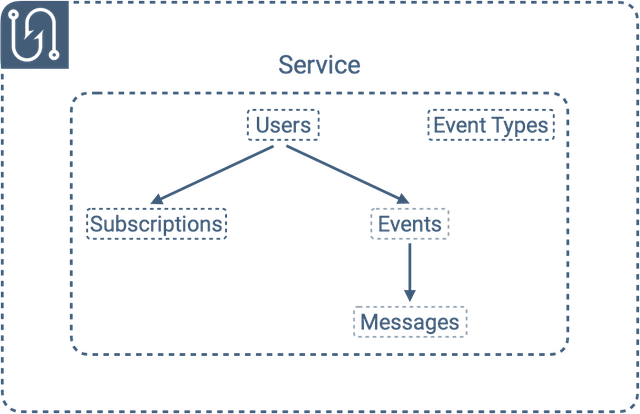
Services are Tacklebox’s top-level entity, and they represent the applications for which we’re providing webhooks. Each service has its own set of users, event types, subscriptions, events, and messages. Within a specific service, each user has its own set of subscriptions, events, and messages. And lastly, within a specific user, each event has its own set of messages.
Adding Services
Because every other entity is associated with a specific service, the next step in our setup will be adding a new service. Tacklebox provides two ways to do this: you can send a POST request to the Tacklebox API (the url is the API Host mentioned previously), or you can use one of our client libraries in the language of your choice.
-
JavaScript
-
Ruby
-
Go
-
Python
-
cURL
              const Tacklebox = require('tacklebox-lib');

              const apiKey = "ibY83fHnC99OlAN4YGoTE7TuBDB7xRjD7B0dYi0k";
              const baseUrl = "https://ukfl963bh1.execute-api.us-west-1.amazonaws.com/v1/";
              const tb = new Tacklebox(apiKey, baseUrl);
              const serviceData = { name: "todo_app" };

              (async () => {
                const newService = await tb.service.create(serviceData);
              })();
require "tacklebox"
api_key = "ZOyhHr4Czd4jZHUR4T7j0aUFhyUfIQuN6NOpFV8M"
base_url = "https://98co0luvh2.execute-api.us-east-2.amazonaws.com/v1/"
tb = Tacklebox.new(api_key, base_url)
service_data = {"name" => "todo_app"}
new_service = tb.service.create(service_data)
package main
import "github.com/tacklebox-webhooks/golang"
func main() {
tb := tacklebox.Webhooks{
ApiKey: "ZOyhHr4Czd4jZHUR4T7j0aUFhyUfIQuN6NOpFV8M",
BaseUrl: "https://98co0luvh2.execute-api.us-east-2.amazonaws.com/v1/"}
serviceData := map[string]interface{}{"name": "todo_app"}
newService := tb.Service().Create(serviceData)
}
from tacklebox_webhooks import Tacklebox
api_key = "ZOyhHr4Czd4jZHUR4T7j0aUFhyUfIQuN6NOpFV8M"
base_url = "https://98co0luvh2.execute-api.us-east-2.amazonaws.com/v1/"
tb = Tacklebox(api_key, base_url)
service_data = {"name": "todo_app"}
new_service = tb.service.create(service_data)
              curl -X POST https://ukfl963bh1.execute-api.us-west-1.amazonaws.com/v1/services \
              -H "Content-Type: application/json" \
              -H "x-api-key: ibY83fHnC99OlAN4YGoTE7TuBDB7xRjD7B0dYi0k" \
              -d '{
              "name": "todo_app"
              }'
Because services represent applications, and applications are typically static and are only set up once during initial implementation, it might make more sense to manually send an HTTP request to add a service. As we’ll see in the following sections, however, many of Tacklebox’s entities are added frequently and dynamically. In those cases, using one of Tacklebox’s client libraries to integrate Tacklebox API calls into your application’s code is a more natural fit.
Once you’ve added a service, you’re now ready to add event types and users to that service.
Adding Event Types
Event types represent an action in the application for which you’re providing webhooks. These are the things your consumers want to be notified about. While it’s ultimately up to you to decide what event types are appropriate for your application, some examples would be “todo_created”, “order_fulfilled”, or “comment_edited”. Tacklebox allows consumers to choose which event types they want to subscribe to, so during the setup phase you’ll want to add all of the event types your consumers might potentially want to subscribe to.
-
JavaScript
-
Ruby
-
Go
-
Python
-
cURL
              // Setup code omitted

              const serviceId = "be43fe8d-d06a-46f7-bb8b-a75693e3810a";
              const eventTypeData = { name: "todo_created" };

              (async () => {
                const newEventType = await tb.eventType.create(serviceId, eventTypeData);
              })();
# Setup code omitted
service_id = "d90af763-5839-4a90-834c-5512980984f5"
event_type_data = {"name" => "todo_created"}
new_event_type = tb.event_type.create(service_id, event_type_data)
              func main() {
                  /* Setup code omitted */

                  serviceId := "d90af763-5839-4a90-834c-5512980984f5"
                  eventTypeData := map[string]interface{}{"name": "todo_created"}

                  newEventType := tb.EventType().Create(serviceId, eventTypeData)
              }
# Setup code omitted
service_id = "d90af763-5839-4a90-834c-5512980984f5"
event_type_data = {"name": "todo_created"}
new_event_type = tb.event_type.create(service_id, event_type_data)
              curl -X POST
              https://ukfl963bh1.execute-api.us-west-1.amazonaws.com/v1/services/be43fe8d-d06a-46f7-bb8b-a75693e3810a/event_types
              \
              -H "Content-Type: application/json" \
              -H "x-api-key: ibY83fHnC99OlAN4YGoTE7TuBDB7xRjD7B0dYi0k" \
              -d '{
              "name": "new_event_type_name"
              }'
As with services, event types are also fairly static and are typically known before implementation, so again using a manual HTTP request to add an event type may be easier.
Adding Users
Now that you’ve got a service and some event types added, you’ll want to create users, which represent the consumers of your webhooks. Users can represent many things depending on your use case; for Github, users are repositories, and for a todo app users might be the owners of each todo list. If the application you’re providing webhooks for has distinct users, it’s best to align your Tacklebox users with them. Users allow Tacklebox to ensure that an event created by a specific user only sends webhook notifications to that user’s endpoints.
-
JavaScript
-
Ruby
-
Go
-
Python
-
cURL
              // Setup code omitted

              const handleAddUser = async (userData) => {
                const webhookUserData = await tb.user.create(serviceId, userData);
                addUserToMainApplication(userData, webhookUserData);
              }
# Setup code omitted
def handle_add_user(user_data)
webhook_user_data = tb.user.create(service_id, user_data)
add_user_to_main_application(user_data, webhook_user_data)
end
/* Setup code omitted */
func handleAddUser(tb tacklebox.Webhooks, serviceId string, userData map[string]interface{}) {
webhookUserData := tb.User().Create(serviceId, userData)
addUserToMainApplication(userData, webhookUserData)
}
              # Setup code omitted

def handle_add_user(user_data):
  	webhook_user_data = tb.user.create(service_id, user_data)
  	add_user_to_main_application(user_data, webhook_user_data)
              curl -X POST
              https://ukfl963bh1.execute-api.us-west-1.amazonaws.com/v1/services/be43fe8d-d06a-46f7-bb8b-a75693e3810a/users
              \
              -H "Content-Type: application/json" \
              -H "x-api-key: ibY83fHnC99OlAN4YGoTE7TuBDB7xRjD7B0dYi0k" \
              -d '{
              "name": "new_user_name"
              }'
The benefit of using a client library starts to become apparent in this situation. If you’d like to add a new user to Tacklebox every time you add a new user to the app you’re providing webhooks for, all you need to do is drop a few lines of code into your existing user creation handler. The client automatically includes the required API Key in its request, and the returned object contains the new user’s Tacklebox Id and other info that might be useful to your application.
Adding Subscriptions
In order for your users to actually receive webhook notifications, they need to register a subscription. A subscription contains the URL the consumer wants you to send event notifications to, as well as the specific event types they want to be notified about. A single user can have more than one subscription. For example, a user might have a separate subscription for testing purposes with a different URL than their main subscription.
-
JavaScript
-
Ruby
-
Go
-
Python
-
cURL
              // Setup code omitted

              const handleAddSubscription = async (userId, subscriptionData) => {
                const newSubscription = await tb.subscription.create(serviceId, userId, subscriptionData);
              }
# Setup code omitted
def handle_add_subscription(user_id, subscription_data)
new_subscription = tb.subscription.create(service_id, user_id, subscription_data)
end
/* Setup code omitted */
func handleAddSubscription(tb tacklebox.Webhooks, serviceId, userId string, subscriptionData map[string]interface{}) {
newSubscription := tb.Subscription().Create(serviceId, userId, subscriptionData)
}
              # Setup code omitted

def handle_add_subscription(user_id, subscription_data):
	new_subscription = tb.subscription.create(service_id, user_id, subscription_data)
              curl -X POST
              https://ukfl963bh1.execute-api.us-west-1.amazonaws.com/v1/services/be43fe8d-d06a-46f7-bb8b-a75693e3810a/users/48676b26-2906-4454-8436-bcc86383b7c5/subscriptions
              \
              -H "Content-Type: application/json" \
              -H "x-api-key: ibY83fHnC99OlAN4YGoTE7TuBDB7xRjD7B0dYi0k" \
              -d '{
              "url": "https://myendpoint.io",
              "eventTypes": ["todo_created"]
              }'
A nice feature that many webhook providers choose to implement is a UI that allows their users to create their own subscriptions. You can use the client library to add a new subscription in Tacklebox when the user adds it in the UI.
At this point your Tacklebox service has all of the building blocks it needs to operate. You will, of course, likely add new services, event types, users, and subscriptions moving forward, however at this stage you have populated your account with enough data to use Tacklebox’s main feature: sending webhook notifications.
5.2 Sending Webhooks
Creating Events
Sending webhook notifications to subscribers is done indirectly with Tacklebox. You don’t directly ask Tacklebox to send a message to a specific subscriber or set of subscribers. Instead, you create a new event, and Tacklebox automatically sends a webhook notification to every subscriber that is subscribed to that event’s event type. This workflow is important to understand - subscriptions are set up beforehand, so that at the time of an event, Tacklebox already has all of the information necessary to notify the applicable consumers.

Above on the left, we trigger an event in an application that is using Tacklebox. In this case, the event is the creation of a new purchase order. The application’s code sends a POST request to Tacklebox’s API which contains the event type, service, and user info. Tacklebox processes the event, gathers the list of subscribers subscribed to that event type, and sends a webhook notification to each one. On the right, one of our subscribers receives that notification at the URL they specified when creating their subscription.
How did the application send a POST request to Tacklebox’s API to create an event? If the app is using one our clients, it might look like this:
-
JavaScript
-
Ruby
-
Go
-
Python
-
cURL
              // Setup code omitted

              const handleTodoCreated = async (userId, todoData) => {
                createTodoInApplication(todoData);
                todoData.idempotencyKey = newIdempotencyKey();
                const newTodo = await tb.event.create(serviceId, userId, todoData);
              }
              # Setup code omitted

def handle_todo_created(user_id, todo_data)
  create_todo_in_application(todo_data)
  todo_data.idempotency_key = new_idempotency_key()
  new_todo = tb.event.create(service_id, user_id, todo_data)
end
/* Setup code omitted */
func handleTodoCreated(tb tacklebox.Webhooks, serviceId, userId string, todoData map[string]interface{}) {
newTodo := tb.Event().Create(serviceId, userId, todoData)
}
              # Setup code omitted

def handle_todo_created(user_id, event_data):
    create_todo_in_application(todo_data)
    todo_data["idempotency_key"] = new_idempotency_key()
    new_todo = tb.event.create(service_id, user_id, todo_data)
              curl -X POST
              https://ukfl963bh1.execute-api.us-west-1.amazonaws.com/v1/services/be43fe8d-d06a-46f7-bb8b-a75693e3810a/users/48676b26-2906-4454-8436-bcc86383b7c5/events
              \
              -H "Content-Type: application/json" \
              -H "x-api-key: ibY83fHnC99OlAN4YGoTE7TuBDB7xRjD7B0dYi0k" \
              -d '{
              "eventType": "todo_created",
              "payload": '{
              "msg": "A todo was just created by a user",
              "creation_id": "32789073883",
              "archived": "false"
              }',
              "idempotencyKey": "12334452643544542645435"
              }'
Viewing Webhook Data
Now that Tacklebox is sending webhook notifications to your subscribers, you may want to view that data
visually. Tacklebox’s management UI gives you a central place to view entities, messages, and a dashboard with
metrics. You can start the UI by running: tacklebox ui. This spins up the management UI locally,
which you can view in a browser at http://localhost:3001.

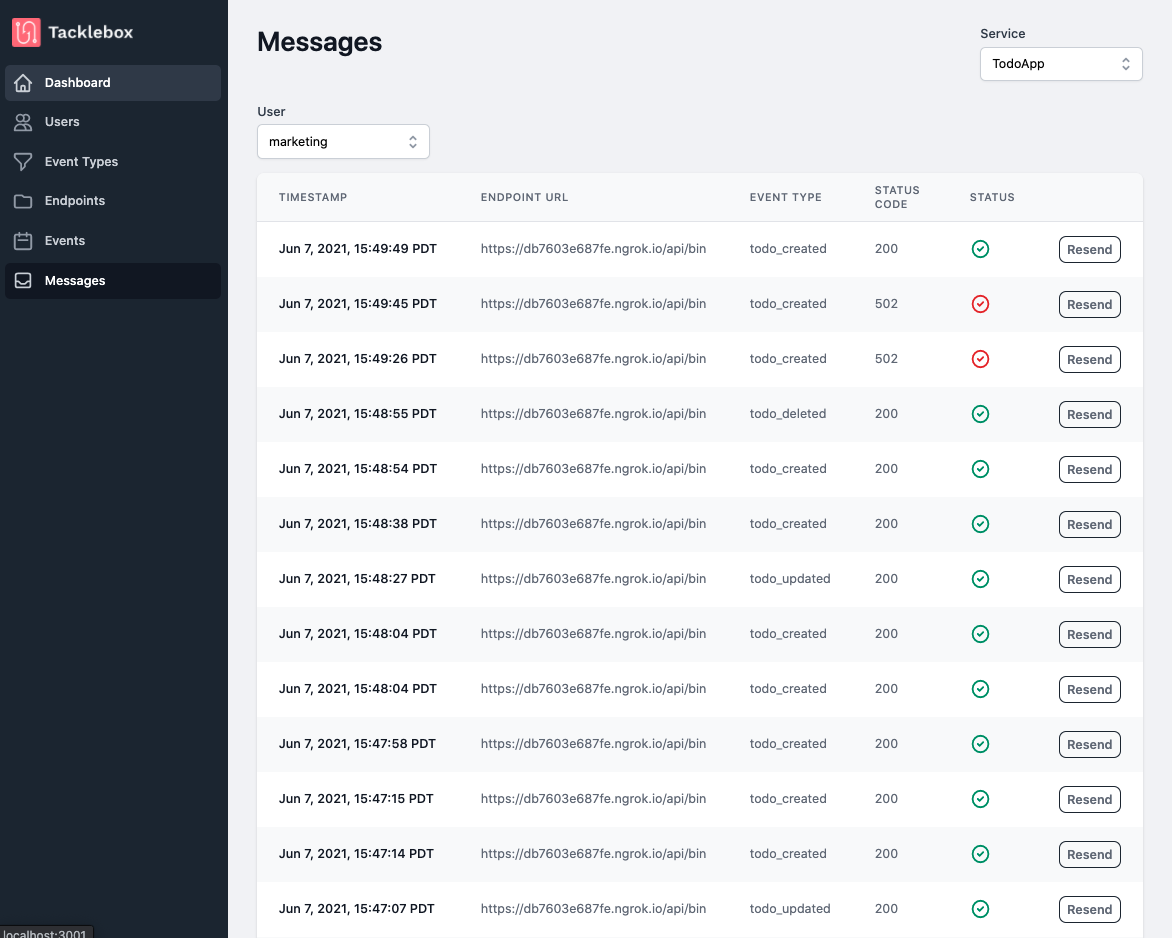
The main dashboard gives you an overview of each service. It shows how many users, subscriptions, events, and messages that service has, in addition to graphs that visualize message and event data by date, type, status code, and user.
The other pages show detailed information about specific entities. The messages page, for example, shows a list of all of the messages a specific service has generated, and it can be filtered by user. If the message failed and needs to be resent, you can click the “resend” button.
5.3 Teardown
If you no longer need Tacklebox for one of your applications, you can use one of the following to delete it:
-
JavaScript
-
Ruby
-
Go
-
Python
-
cURL
              // Setup code omitted

              (async () => {
                const deletedService = await tb.service.delete(serviceId);
              })();
# Setup code omitted
deleted_service = tb.service.delete(service_id)
              /* Setup code omitted */

              func main() {
                  deletedService := tb.Service().Delete(serviceId)
              }
              # Setup code omitted

deleted_service = tb.service.delete(service_id)
              curl -X DELETE
              https://ukfl963bh1.execute-api.us-west-1.amazonaws.com/v1/services/be43fe8d-d06a-46f7-bb8b-a75693e3810a \
              -H "Content-Type: application/json" \
              -H "x-api-key: ibY83fHnC99OlAN4YGoTE7TuBDB7xRjD7B0dYi0k"
Deleting a service effectively hides it and all of its event types, users, and subscriptions. The event and message history, however, remain visible and are preserved as long as you continue to use Tacklebox.
If you no longer need Tacklebox for any of your applications, you can tear down the entire service
with a single command: tacklebox destroy. This command removes all of Tacklebox’s AWS
infrastructure, including the database, so be sure before running
it.
6. How We Built Tacklebox
Now that we understand how to use Tacklebox, we can discuss how we built it. In this section, we will explore Tacklebox’s architecture, some challenges we encountered while implementing it, and the tradeoffs we made along the way.
6.1 Webhook feature requirements
Before we can talk about the Tacklebox architecture, it’s important to understand the feature requirements for a webhook service. Since consolidation is a key part of our use-case, allowing multiple applications to use Tacklebox simultaneously was important to us. Additionally, we wanted to allow providers to specify event types for their webhook service. Github’s webhook feature would be considerably less useful if users had no control over the types of event notifications they receive. Allowing granular control over event types is necessary.
Next, we wanted to provide easy access to message history. This includes two distinct parts: persisting every message sent by Tacklebox (along with delivery statuses) and providing an interface to view that message history. Finally, we wanted to send messages to consumers when events occur.
6.2 Tacklebox Architecture
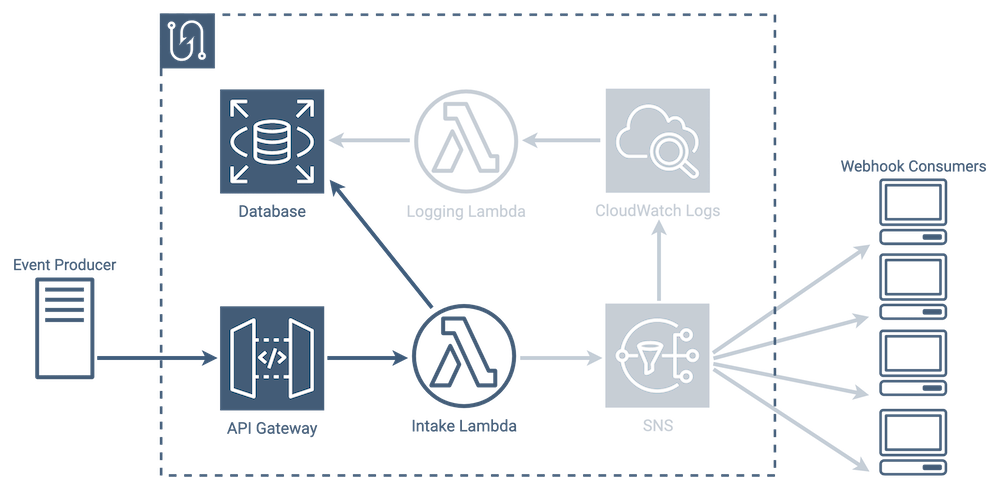
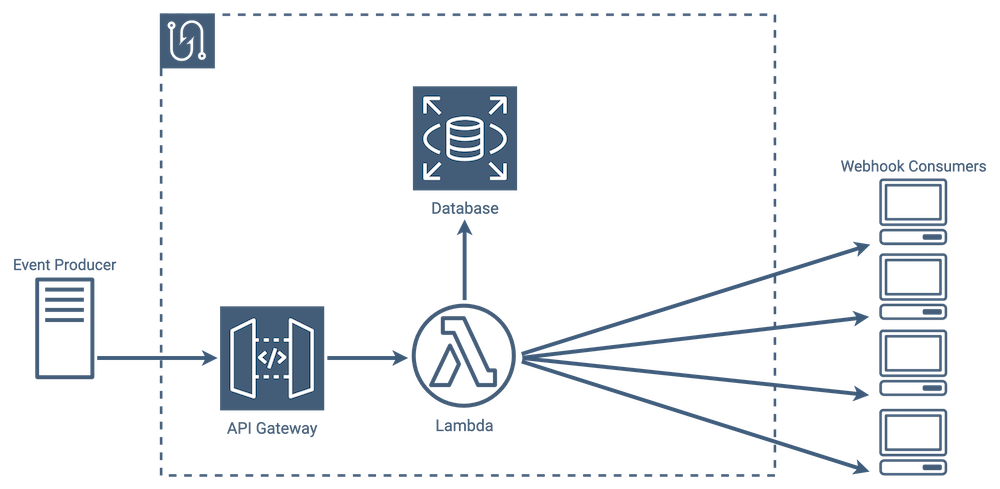
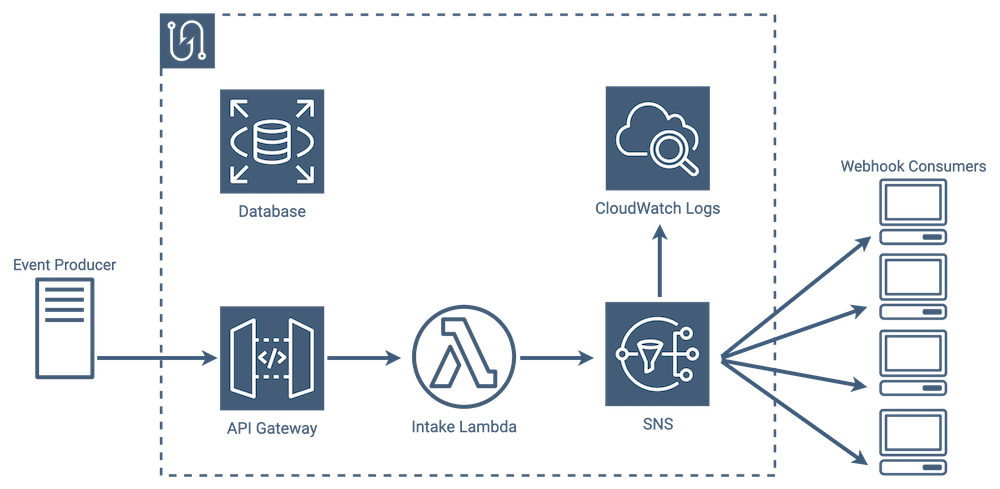
Architecture Overview
In our architecture, notification intake is handled by a pair of services: API Gateway and Lambda Functions. API Gateway serves as the entry point into Tacklebox, and passes incoming notifications to an intake Lambda. The next two steps in the life cycle, gathering consumers and sending messages, are handled by the Simple Notification Service.

The last step, saving messages to the database, is taken care of by a combination of a log service, CloudWatch Logs, and a lambda that transfers message information from the logs to our database.
Event/Message Lifecycle
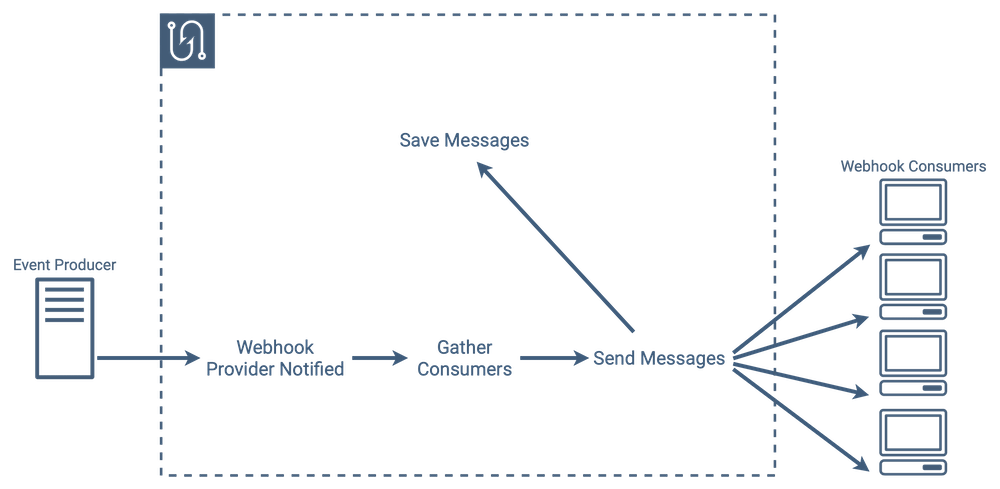
The core functionality of a webhook service is sending messages to endpoints when events occur. That process might include the following steps:
-
An event occurs in an application, and that application notifies the webhook service.
-
The webhook service looks at the event type, and gathers a list of subscribers that need to be notified.
-
The webhook service sends a message to every valid subscriber letting them know that an event has occurred. If any message delivery fails, the webhook service attempts to resend the message until it succeeds or reaches a set number of attempts.
-
Each message and its result gets saved to the database, regardless of whether it was successful or not.
CRUD Operations
Even though we are going to be focusing almost exclusively on the event/message lifecycle as we discuss our architecture moving forward, our architecture also tracks additional entities in the database, such as services, users, and event types. Almost all of our CRUD operations are handled by our intake lambda, which communicates directly with the database as needed. There are a few processes that require interacting with both the database and SNS, like creating or updating a subscription, and in those cases, the lambda orchestrates the process.
Database operations within Tacklebox fall into two categories: workflows which involve SNS, and ones that do not involve SNS. The non-SNS operations are much more simple, and involve fewer pieces of the Tacklebox infrastructure. In these cases, the intake lambda, upon receiving a request from API Gateway, interacts with the database directly.
Database Choice
Before we move into the next section to talk about the evolution of our architecture and the challenges we solved along the way, we'd like to briefly discuss our choice of database.
Webhook data seems, at first glance, inherently unstructured. Webhooks have a wide range of real-world applications, and each application dictates the kind of information passed back and forth between webhook provider and webhook consumer. An open-source webhook service needs to be flexible enough to handle many of those applications, so having a database that could adapt to meet those needs seemed important.
This initially led us to consider NoSQL databases due to their strength handling schemaless data. Because we were using AWS infrastructure, the most likely candidate became their DynamoDB service. DynamoDB certainly had its advantages:
-
It's fully managed so our users wouldn't have to maintain it
-
It's designed to be highly available, and that property could be an asset during times when a large volume of events are coming in.
-
It offers a feature called "Streams" which you can integrate with lambda functions to automatically run code when a record is added, updated, or deleted.
The more we considered this, the more we realized that webhook data as a whole is actually quite predictable and structured. Entities like users, events, messages, and subscriptions share common characteristics across webhook implementations. In fact, the only piece of data related to webhooks that is really quite different across implementations is the payload that gets delivered to the consumer when an event occurs. We would certainly need to be able to handle a range of payloads, but even those have high-level similarities, and most can be represented by a JSON object.
The following Entity Relationship Diagram shows how we ended up structuring our data. We used the jsonb data type for our payload field in the events table, which allows us to store normal JSON objects efficiently.
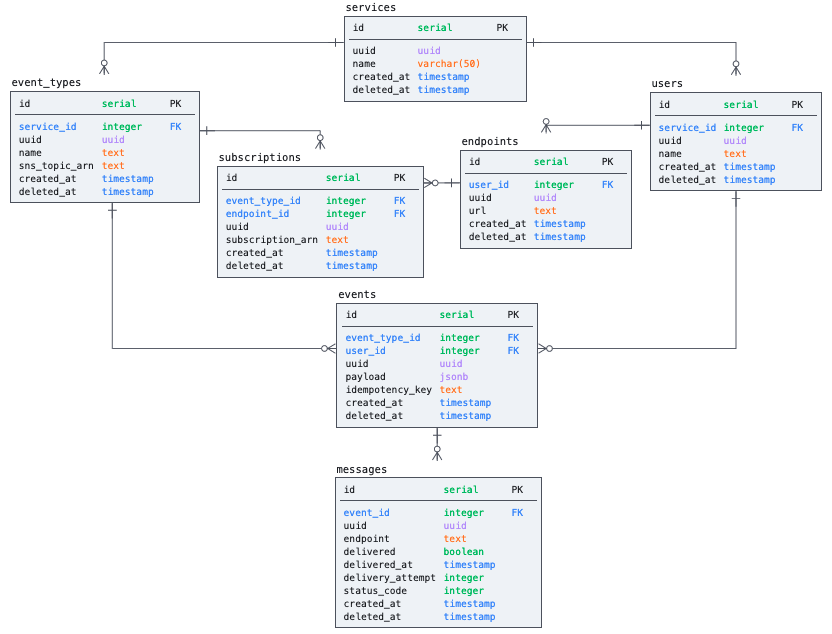
Most of the features we'd be trading off by going with PostgreSQL instead of DynamoDB were ones our use case didn't really demand - specifically built for high availability, schemaless, and able to support tables of virtually any size and very high read/write traffic. The one thing we didn't want to lose was the fact that DynamoDB is fully managed, which was key to our project goal of making Tacklebox easy to deploy and manage.
Amazon's Relational Database Service (RDS) allowed us to retain most of that benefit. It's not quite as hands-off as DynamoDB when it comes to things like scaling, however it comes close regarding overall maintenance. RDS handles the hosting, provisioning, and patching of the database, and it allowed us to use PostgreSQL as the actual database, which is widely used and reliable.
In the end, both DynamoDB and RDS with PostgreSQL would have worked in our implementation, but our use case didn't really take advantage of DynamoDB's strengths, so we chose RDS with PostgreSQL.
6.3 How we dealt with wasted uptime
Initial Implementation
Our initial implementation of Tacklebox used a single application server.
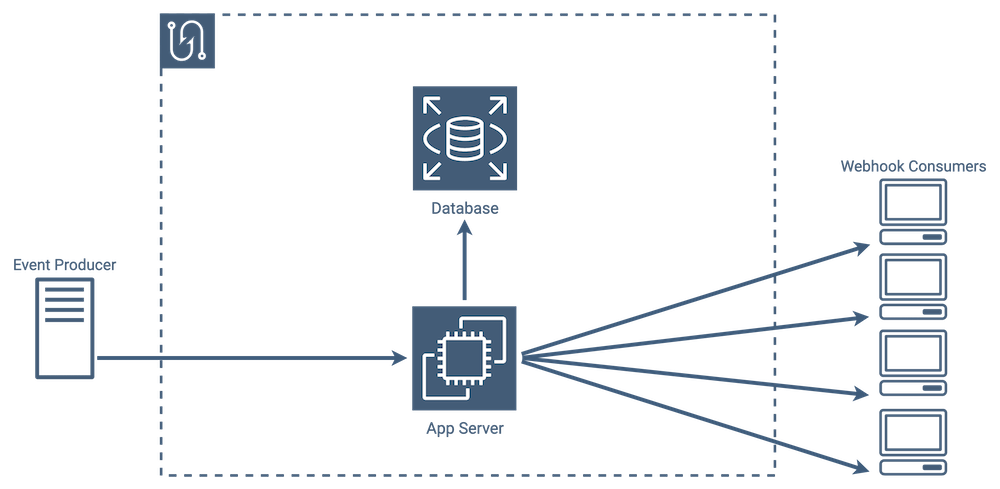
This approach worked for our use-case, but we saw an opportunity to optimize our infrastructure. Webhooks usage patterns are often unpredictable and can have moments of high-use as well as periods of minimal usage. As a result, with this single app server architecture, we were leaving a decent amount of compute power unused. To address this inefficiency, we decided to use AWS Lambda Functions.
Lambda Implementation
Lambda functions, which are a “Function as a Service” offering from AWS, allow us to only run code when needed. This also means that you only pay for the compute that you actually use.
As with any service, lambdas come with tradeoffs:
-
First of all, cold start times can increase latency (cold start time refers to the time that it takes to load the function into memory before it can be invoked)
-
Lambdas are stateless, so accessing persistent data requires a call to another service
-
Lambdas have an execution time limit - currently this is set to 15 minutes.
We found these tradeoffs acceptable for Tacklebox. Going with lambdas, though, meant that each lambda would have to do all of the following tasks every time it runs:
-
Intake a new event and persist it to the database
-
Gather subscriptions and create messages for each subscriber
-
Send messages to all subscribers and wait for their responses
-
Write responses to the database
-
Respond back to the event producer
6.4 How we handled message fanout
Message Fanout Process
With the implementation in the previous section, the message fanout process in particular is expensive. When an event comes in, a lambda function gets fired up and creates a list of messages that need to be sent to each consumer listening for that event type.
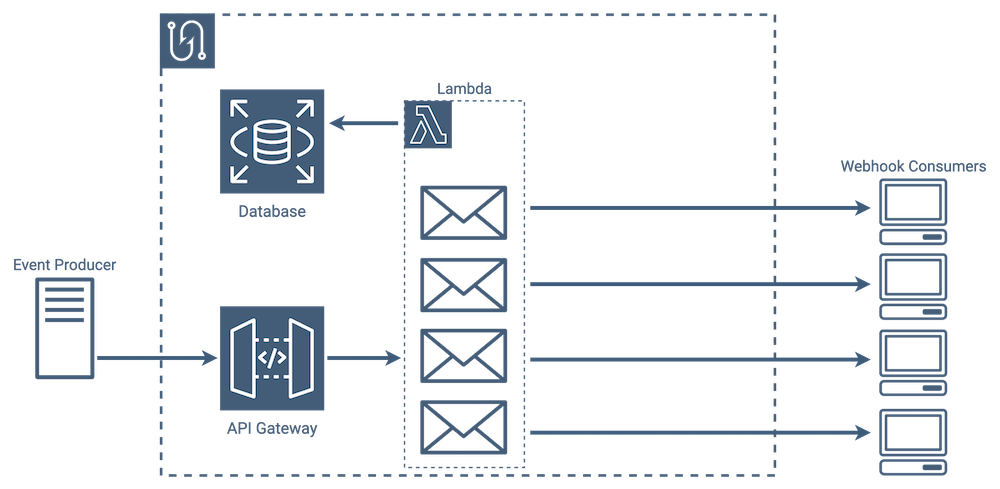
The lambda not only has to send the messages, but also has to wait for a response from each endpoint before it can finish its work by writing the results to the database. Because webhooks are typically application or user-specific, the number of consumers needing to be notified when a given event occurs is typically low, however even with tens of consumers the chance that one of the consumer’s endpoints will fail over time increases. [10]
Message Retries
If a message delivery fails, the burden of resending lies with the same lambda. It can't save the results of any of the messages it delivered until all of the retries have completed. We chose to implement our retry logic with an exponential backoff, which is a common algorithm that increases the amount of time between successive retries. This means not only that a lambda might have to wait for multiple retries to finish, the amount of time between retries is going to increase every time. We originally chose to use lambdas to reduce unused uptime. Having a lambda function running for minutes at a time, waiting to attempt the next retry was contrary to that decision.
Endpoint Failure
A quick note about endpoint failure and what that means in the context of Tacklebox and webhooks in general. An HTTP response to a webhook request typically falls into two general categories - you either get a response from the consumer or you don't (i.e. a timeout). At minimum, we need to know that a consumer's endpoint received the message, so we consider timeouts within a reasonable amount of time to be failures.
When you do receive an explicit response and are considering the status code, you must determine whether it indicates the consumer received the message and whether it makes sense to try sending the message again. Repeatedly sending messages to endpoints that are misconfigured by the consumer, for example, may not make sense. Existing webhook implementations approach this in a wide variety of ways, from strictly requiring a 2xx response [8] to considering anything other than a 5xx response [9] a success. We chose the latter approach.
Split-Lambda Implementation
In order to reduce the number of messages our lambdas had to send, we had several options. We could have added a second lambda, which we’ll call a messenger lambda, which would have allowed us to separate the message creating and message sending processes. With this approach, when an event comes in, our intake lambda would gather the list of consumers that need messages and would call a separate messenger lambda to send each message. Our messenger lambdas could all execute concurrently, instead of waiting for each other to finish.
Retries would be difficult to implement with this approach though - where would we put messages that need to be retried? We could keep the intake lambda running until all of the messenger lambdas finish, so that if one fails a new messenger lambda could spin up to handle the retry, but then the intake lambda would again be waiting for all retries to finish. We could have also queued outgoing messages in the database, but that’s a lot of writing, reading, and deleting for temporary data.
We ideally wanted somewhere we could buffer our outgoing messages, and have a mechanism to quickly pull them off in-order. That’s exactly what a queue does, and a queue would have the added benefit of centralizing our entire outgoing message list into one place, which simplifies debugging.
SQS Implementation
Amazon’s Simple Queue Service, or SQS for short, does exactly this.
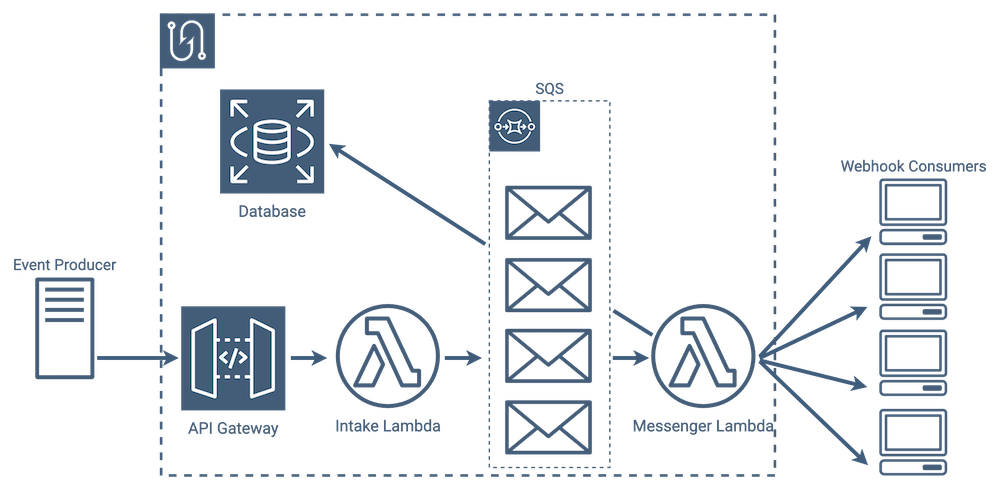
SQS gives us a reliable place to store both our initial and retry messages, which allows our intake lambdas to just focus on creating messages for an event. SQS doesn’t send messages to consumers itself, so we use our messenger lambdas to pull messages off as soon as they appear and send them to the consumer. To prevent our messenger lambdas from waiting on retries, we have them immediately put failed messages back into the queue. Those failed messages are then picked off of the queue by a different lambda invocation at a later time.
By adding SQS we increased the complexity of our implementation, but each piece does fewer things and we sufficiently separated our concerns among services suited for their individual jobs.
Eliminating Polling
We thought that this was a perfectly reasonable implementation, however we wondered if we could eliminate, ironically enough for a webhook service, the polling in our architecture. Our messenger lambdas use polling to constantly check SQS to see if new messages have been added. As we’ve mentioned, webhook events can be intermittent, and all of those polling requests in between events can add up.
Under the hood it gets even more interesting, because when using lambdas with SQS, Amazon requires that a minimum of 5 parallel lambdas poll SQS, so the number of requests is higher still. When your queue is constantly full, all of this polling is a benefit because it allows you to dequeue more quickly, but with our use case, there would likely be periods where this is wasteful. If we could eliminate that polling entirely, we could potentially make our implementation more efficient and reduce latency in the message sending process.
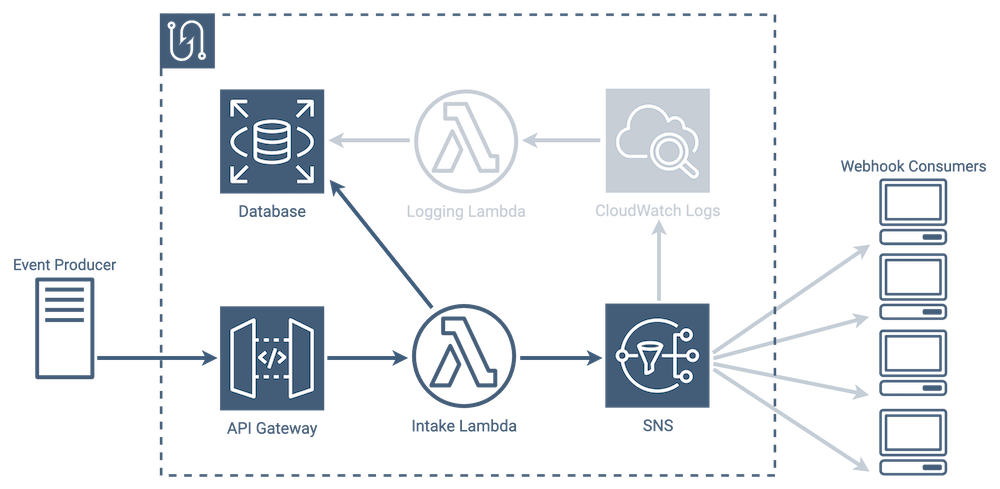
SNS Implementation
We were able to remove polling from the message sending process by using Amazon’s Simple Notification Service, or SNS. SNS is a messaging service that, when given an event, sends a message to every subscriber to that event. It also automatically handles retries. In other words, it does the same job that the combination of SQS and messenger lambda previously did for us.
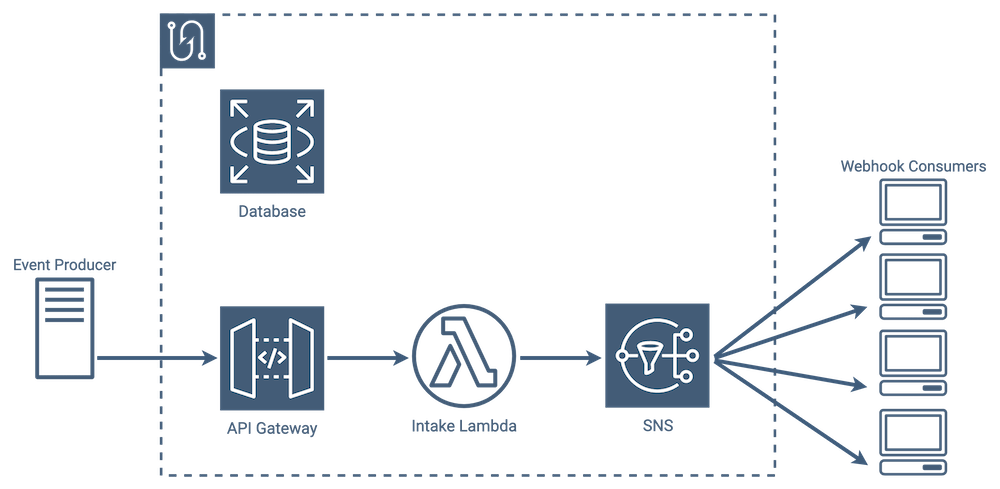
Rather than use polling, SNS uses a pub/sub model where new messages are published to topics, and anyone who is subscribed to that topic automatically receives a message. In webhook parlance, every consumer listening for that event type receives a message.
It’s important to note that SNS itself stores subscription data, so that’s one more job SNS handles for us that our lambdas were previously handling. With SNS, there is no longer a need to pull consumer subscriptions when an event comes in - SNS already knows who needs to be notified.
Comparing SQS and SNS
Switching from SQS to SNS simplifies our architecture and increases our efficiency, however there are some tradeoffs with this approach. SNS has a max retry delay of one hour, compared to SQS’ 12 hours, so there is less flexibility to implement large retry windows. And even though SNS keeps track of subscriptions for us, we still need subscription data in our main database for querying purposes. This means that we now have to keep track of subscriptions in two places and make sure they remain identical.
Both approaches, SQS and SNS, meet our project goals and both have benefits. In the end we chose SNS because it better fits our use case, it removes polling from the message sending process, and it includes features like rate limiting and customizable retry logic out of the box.
6.5 How we persisted message history
Missing Database Link
SNS lacks a built-in way to write message data to our database. In a way, this makes sense - its main job is to fan out messages to consumers, and once it delivers a message or makes every effort to, its job is done.
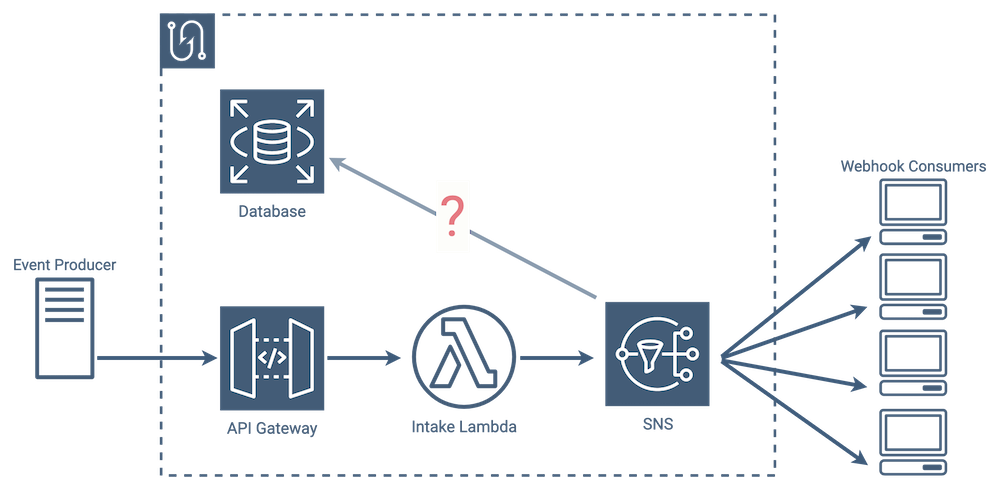
Our entire event/message life cycle currently ends the moment SNS sends a message to a consumer and receives a response. The only thing saved to our database at that point is the original event itself, but no message data has been saved. That means no record identifying the message recipient, payload, response, or timestamp. We needed to find a way to move message data from SNS into our database after the message send process completed.
Adding Compute after SNS
Our first thought was to see if we could tack on some post-process to SNS, like a function that it executes immediately after it receives a response back from a consumer.
SNS doesn’t have a built-in way to do this, but it does allow lambda triggers to be set to run whenever a message is published. Inserting lambdas here though, would again make lambdas responsible for sending messages to consumers, and at that point we’re essentially back at our previous SQS implementation. Instead, we found a way to use a service that SNS was already integrated with.
CloudWatch Logs
SNS stores logging data in Amazon’s CloudWatch Logs service, which is commonly used for debugging and a variety of other tasks. SNS can be configured to log specific events, and in this case we wanted it to log every time it received a response back from a consumer.
Using CloudWatch Logs, we now had our persistent message store, but it wasn’t in the same place as the rest of our data, so we needed to find a way to get it from CloudWatch Logs into our main database.
CloudWatch Logs Lambda Trigger
CloudWatch Logs can be set up to asynchronously invoke a Lambda function, so we set CloudWatch Logs to invoke the lambda when it receives a new SNS log, and once invoked, the lambda transfers the message data in the log to the database.
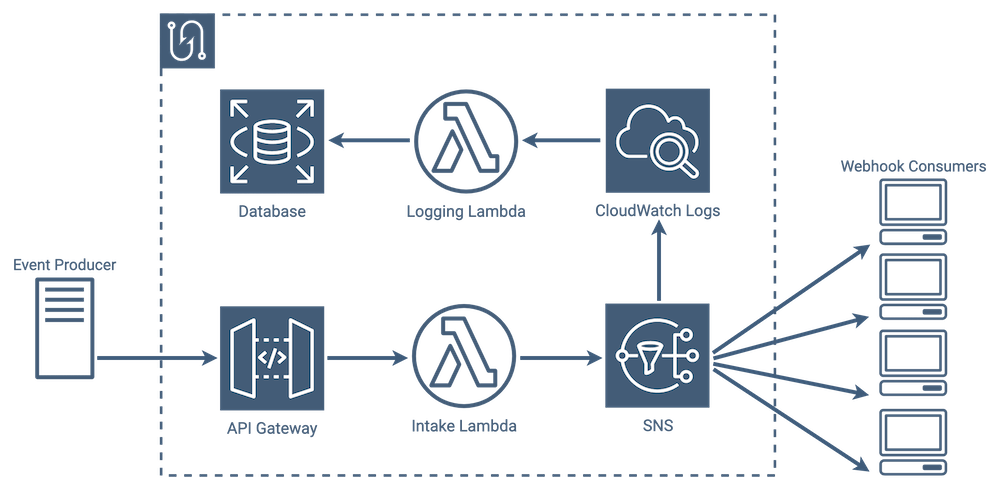
In light of these added steps and services, SNS definitely added complexity to our architecture in some areas. It still, however, abstracted away key functionality in others, and overall we felt that its feature set best fit our implementation and provided a few additional nice-to-haves out of the box.
7. Future Work
And that's Tacklebox! We've got a few ideas that we'd love to work on moving forward, which could add to its flexibility as a webhook service:
7.1 Proxy Server
Tacklebox currently does two things by default that, while useful, are not features all providers might want. It includes AWS metadata in messages sent to consumers that isn’t necessarily relevant to Tacklebox, and it requires consumers to confirm their endpoint, meaning they have to verify they are in control of their endpoint before our service will send any webhook notifications to them.
We could make both of these optional by putting some logic in between SNS and consumers. One way we might do that would be to use a proxy server, which would handle the auto-confirmations and stripping of metadata. But using a typical server would cause us to lose some of that uptime efficiency we gained by going with lambdas.
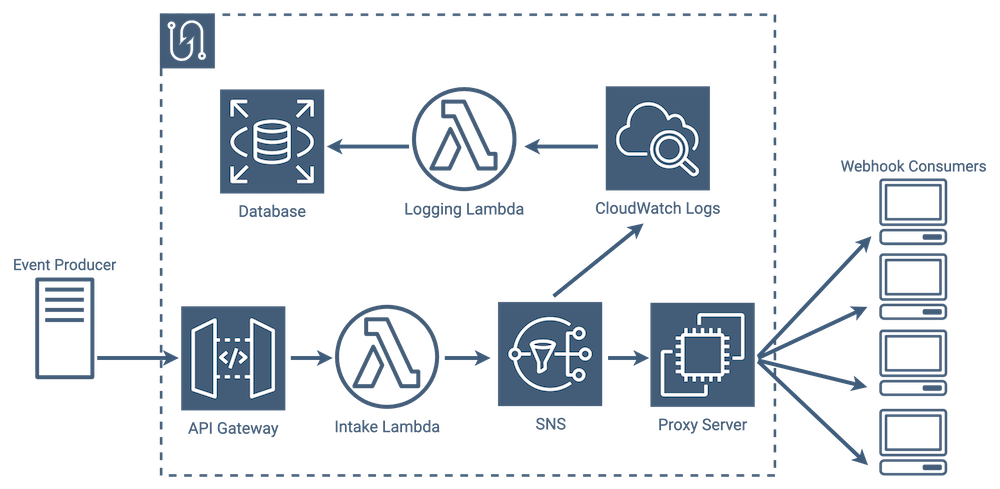
Speaking of which, we could use lambdas to accomplish this, but as we saw in the last section, that extra set of lambdas again adds complexity to the architecture for a feature that only a small percentage of our users would probably use.
7.2 Other Ideas
Another few things we’d like to add are:
-
The ability to dynamically set and change settings like retry policy and rate limiting on a per-consumer basis.
-
A consumer UI that potentially allows them to view their own message history and do things like resend failed messages
-
A dead-letter queue for efficient processing of messages that still, after the max number of retries, failed to be delivered to their consumer endpoint
-
A feature that detects when a consumer endpoint has passed some threshold for successive failures and automatically removes that consumer’s subscription from our service
8. References
- Biehl, M. (2017). Webhooks: Events for RESTful APIs. API-University Press. ↩︎
- https://launchschool.com/books/working_with_apis/read/defining_api#provider_and_consumer ↩︎
- https://docs.github.com/en/rest/reference/repos#list-branches ↩︎
- https://docs.github.com/en/developers/webhooks-and-events/webhooks/webhook-events-and-payloads#create ↩︎
- https://stripe.com/docs/webhooks ↩︎
- https://developer.twitter.com/en/docs/twitter-api/enterprise/account-activity-api/guides/getting-started-with-webhooks ↩︎
- https://developer.intuit.com/app/developer/qbo/docs/develop/webhooks ↩︎
- https://stripe.com/docs/webhooks/build ↩︎
- https://docs.aws.amazon.com/sns/latest/dg/SendMessageToHttp.prepare.html ↩︎
- Kleppmann, M. (2017). Message-Passing Dataflow. In Designing data-intensive applications (pp. 137–137). O'Reilly. ↩︎
- https://developer.squareup.com/blog/reliable-webhooks-using-serverless-architecture/ ↩︎
- https://wise-engineering.com/case-studies/notification-system/ ↩︎